• Welcome to Tekno RC Forums! Are you a Tekno RC fan? If so you're in luck as you've have arrived to the biggest and best Tekno RC community.

    Come join our community and ask your questions, show off your Tekno RCs and share your experience!

BUILD/REVIEW EB48 2.0

This site may earn a commission from merchant affiliate
links, including eBay, Amazon, and others.
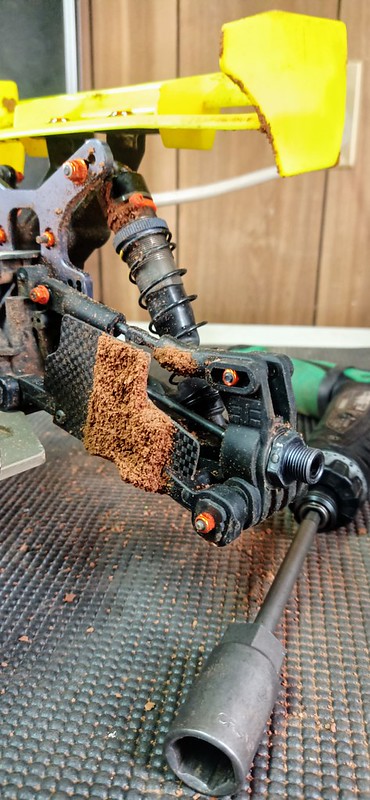
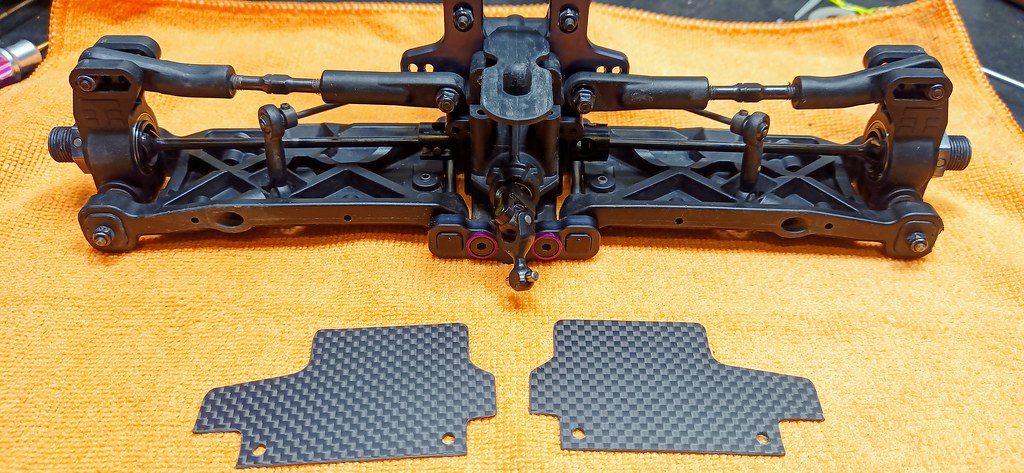
Spent some time on my CNC today milling custom mud guards with 1mm thick carbon for the buggy, pretty happy with the results :)

50563822573_d0645e4203_b.jpg


50563352968_0097977087_b.jpg


50564098231_6e5a677347_b.jpg


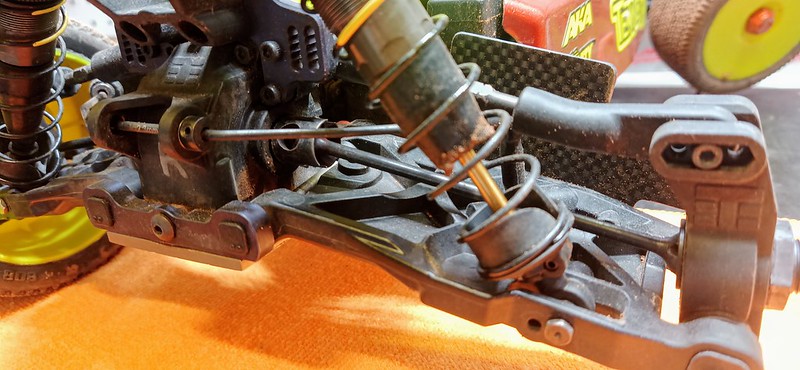
No tire rub at full droop too!
 
Do people actually use mud guards any more?:LOL::ROFLMAO:
You know I'm just messing with you. (y)
After using "mud guards" for the past couple of months, I won't go without them. My situation is not about controlling mud, but trying to keep small stones/pebbles from being chucked at the rear shocks, and shredding the shock boots. As an added bonus, I have less pebbles getting into my spoked wheels. I had great results with 1mm thick carbon fiber guards using this stuff I found on eBay: https://www.ebay.com/itm/2X-Carbon-Fiber-Plate-Panel-Sheet-Board-Glossy-Matte-Plain-Twill-Weave-100x150mm/223910571082?ssPageName=STRK:MEBIDX:IT&_trksid=p2057872.m2749.l2649
 
Glad to hear it! I have never used mud guards before, but starting to see more drivers running them lately and I can see a considerable amount of less mess around the rear bearings. I also noticed that the 2.0 guards aren't as recessed inside the wheel, so my goal was to make the guard get a little closer to the bearing like the 1.0 guard design. Can't wait to test these out in a couple weeks after the RC Pro Finals. Unfortunately I didn't get signed up for the race before it sold out (200 entry max limit) but the extra cash I'm saving on the entry fees will help me save up faster to get the ET48 2.0 sooner! Also hoping these mud guards will be compatible with the truggy arms, but I still have my CAD points saved in case I need to make a few tweaks to the design ;)
 
Glad to hear it! I have never used mud guards before, but starting to see more drivers running them lately and I can see a considerable amount of less mess around the rear bearings. I also noticed that the 2.0 guards aren't as recessed inside the wheel, so my goal was to make the guard get a little closer to the bearing like the 1.0 guard design. Can't wait to test these out in a couple weeks after the RC Pro Finals. Unfortunately I didn't get signed up for the race before it sold out (200 entry max limit) but the extra cash I'm saving on the entry fees will help me save up faster to get the ET48 2.0 sooner! Also hoping these mud guards will be compatible with the truggy arms, but I still have my CAD points saved in case I need to make a few tweaks to the design ;)
The hole spacing for the mudguards will be different on the truggy arms.
 
Hi all! I recently started my EB48 2.0 build. Coming from 1/10th scale
i don't like the fact of using screws to limit shock downtravel aka damaging the chassis. So i got a set of M4x8x1mm plastic shims.
Added 5 shims to the front shocks + 36mm droop to get 115mm of total shock length as stated in the manual
1604993345993.png


As I will be running on a clean surface, i won't be using shock boots. Not adding shock boots increases amount of shock uptravel so spring cup hits the shock body. I would need to remove 1.5mm of material from the spring cup to prevent this:

Another question I have is the shock piston side. One side shows a small flat notch. Notch up or notch down?

Thanks!
 
I like to place the "raised lip" on the piston closest to the nut, this will lower the piston into the shock body and presumably be less likely to crack as it will be less likely to get in contact with the shock cap, but honestly that lip is so small it's probably insignificant.

You'd be surprised how fast your oil gets dirty without boots, even on a turf track, my 1/10 cars sans boots tend to get just as dirty as the oil in my EB48 on dirt in about the same amount of track time!
 
Last edited:
I guess we don't state this anywhere, but that little raised portion on the middle of the piston is supposed to go towards the bottom of the shock. We do this because we've found that if the piston is allowed to be completely flat on the bottom of the shock body, you get some stiction and the shaft doesn't go in as smoothly. This rarely ever comes up because we limit droop in most cases so it's really not a big deal.
 
I guess we don't state this anywhere, but that little raised portion on the middle of the piston is supposed to go towards the bottom of the shock. We do this because we've found that if the piston is allowed to be completely flat on the bottom of the shock body, you get some stiction and the shaft doesn't go in as smoothly. This rarely ever comes up because we limit droop in most cases so it's really not a big deal.
That's a great move. I always put a plastic droop limiter under the piston (like the pic above) to prevent that stiction you mentioned.

I'm trying to avoid the use of that droop limiter screws. For now 5x1mm front and 1x1mm rear did the trick. It isn't really necessary to use the rear spacer, but it's there because of that stiction.

What about shock uptravel without the shock boots?
Is it better to remove some material from the spring cup or limit the uptravel using an o-ring?
I know this is a tuning option but it would be great to know how the car was designed to have the correct starting point
 
o-rings alone aren't going to be enough to soften up-travel, the hottest upgrade for literally every single person racing at Thornhill right now are these shock cushions, it takes a while to set up properly with some trial and error, but once you get it figured out then this a major game changer:
https://www.teknoforums.com/threads/build-review-eb48-2-0.1864/post-16216
Bill, are you (or the guys using the bump stops) tuning your shock package any differently? Like going to a lighter oil for instance?
 
Bill, are you (or the guys using the bump stops) tuning your shock package any differently? Like going to a lighter oil for instance?

These cushions are a fairly new concept to most of us, though Chris Allison has the most race experience out of any of us at Thornhill. Apparently these were fairly popular back in the 80's-90's era but somehow they kinda faded away and now Chris has resurrected them.

Honestly I haven't tried going with lighter oil yet, but I think that sounds like an excellent suggestion. I'll talk to Chris at the track tonight and see if he's already experimented with lighter fluids/spring rate, etc...
 
I spoke with Chris tonight and he confirmed that the shock cushions will give you the ability to soften both the fluids and the springs, possibly reduce spring load as well to suit a myriad of tuning options to handle a wider range of track conditions. Here is Chris's current setup with the cushions:

EB482.0_Chris Allison 10-26-2020 (1).jpg
 
We're noticing that when using the shock cushions, they tend to cause the shock boots to bunch up, some folks are using AE boots which tend to be a little shorter, but I started using the SCT410 front boots which are about 8mm shorter with a shock cushion on top left side here for comparison with the stock EB48 boot on the right:

50653948918_62d631ede0_b.jpg
 
So far I've logged 16 race days and the buggy keeps getting faster as I work on the setup. Couple new changes I've made that are worth pointing out:


1) I'm noticing that my front wheels are getting scratches inside them around the outer edge and this is caused by TKR1250 protruding past the lock nut:
50727367306_1294afcf13_c.jpg


Perhaps this could be solved by adding more spacers underneath the steering link but that would change the bump steer setting to I've opted to flip TKR1250 so that the lock nut is on the bottom of the spindle arm:
Capture.JPG


This significantly reduced the height of the end and there is no chance for the wheel to rub on the wheel now ;)

50727358241_aebe8237ed_c.jpg


2) I placed a 4mm spacer between the servo saver and the steering link to make the arm relatively level with the servo arm. This negates any "trailing bump steer" effect from the servo arm to the servo saver so that the swing action is more linear:
50707139452_193171bc0f_c.jpg


3) I invested in a 17mm Quick Bit for my cordless screw driver and this has saved me an enormous amount of time servicing my wheels! I also started swapping out some steel nuts with lightened aluminum nuts, this was more for a contrasting color effect than for any performance reasons, though the mud guards I've been using have been doing a really good job of keeping mud off my shock boots, this is a must-have upgrade for anyone running on a wet track who wants to keep their shock oil cleaner for longer ;)

50707057121_140bbde0eb_c.jpg
 
Last edited:
So the SCT shock boots are still bunching up with the shock cushions, looks like I will need to pick up a set of AE boots at the track tomorrow:

50731230576_d6a142dcd2_c.jpg
 
Since those shock cushions are a smaller dia, have you tried to put them inside the boots? When I use our black rubber orings (TKR5125) to limit uptravel I place them on the inside of the boot.
 
Since those shock cushions are a smaller dia, have you tried to put them inside the boots? When I use our black rubber orings (TKR5125) to limit uptravel I place them on the inside of the boot.

now that just makes too much sense, I feel silly for not thinking about that in the first place, ha!

Thanks for the tip and will definitely give this a try!
 
Happy to report that with the cushions placed inside the kit included boots they no longer get bunched up and the cushions worked much better than before, also tried Chris Allison's most recent setup and I've completely shattered a bunch of my personal records on the current layout:
  • Fast Lap went from 34.005 to 33.128
  • Hot Qual went from 9/5:16 to 9/5:09
  • Hot Main went from 14/8:24 to 14/8:19
The setup is way more aggressive and has pushed me a little outside my comfort zone, my consistency isn't there, but the speed is definitely making up the difference making it worth the change. I plan to spend some time at the track this next week to try and see if I can settle it down a pinch without sacrificing too much speed:

EB482.0_Chris Allison 12-2-2020.jpg


Main deviation from Chris's setup is that I am still using the stock aluminum towers, though I've drilled the towers to get the long link camber, I've recently learned that the Thornhill rear towers are 3mm shorter than the stock towers which adds 3mm of droop which I had to compensate for. I might go ahead and buy the rear -3mm carbon towers just because there are probably some other factors in the geometry that are going to make a difference. I also went up to 350/500 on the shock oils to help settle the car as well.

Also saw another racer strip a TEKNO servo arm at the track yesterday, he was using the locked bell cranks and I mentioned that I haven't stripped any servo arms since going back to the servo saver. I know I'm sacrificing a little in steering response but seems less risky to use the servo saver ;)
 

Recent Popular Liked

Back
Top