I mentioned before that I didn't like the ESC mount I'd 3D printed, and decided that I'd redesign it to make it easier to mount and also mount the ESC on it. Where it is mounted doesn't leave much room for putting nuts on screws, so I decided to go with threaded inserts. It's much much easier to install and the ESC can be easily removed too.
This is the base plate. I'm using the same screw pattern to mount it to the chassis as the original mount plate that comes with the MT410.
View attachment 2721
I used carbon fiber tubing for mounting the top plate to it. That was mainly because it was the size I thought I'd use and I had some here. I created a set of bosses on the piece and glued them in.
The clearance holes for a few bosses on the plastic side pieces on the chassis look a little ugly here, but it's not like they're visible when this thing is assembled. I also printed the piece that looks like a step here as it's impossible to print the part as a solid piece like that. I simply glued it on as well.
View attachment 2722
This is the top plate where the ESC is mounted. Designing it took a while. I haven't gotten into anything other than straight forward right angle design work with the modeling software I use, so this was more of a challenge. It came out ok.
View attachment 2723
View attachment 2724
This is the plate where the ESC is actually attached.
View attachment 2725
View attachment 2726
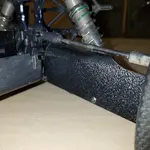
How the base plate is mounted in the chassis. I'll have glued it together as the whole ESC mount assembly before it's put into the chassis for good. This shot is to show how it's located.
View attachment 2727
Glued the top plate to the support rods.
View attachment 2728
View attachment 2729
Mounting the ESC to the its mount plate. There are four 2mm tapped holes in the heat sinks on both sides of the ESC, you can see the top set in this picture. I used the set on the opposite side.
View attachment 2730
Then that is mounted on the top plate of the assembly.
View attachment 2731
Mounted in the MT410.
View attachment 2732
View attachment 2733
Then the motor is added.
View attachment 2734
This is a much more functional design than the first one I came up with.
I removed the bullet connectors that were on the ESC and put an EC5 connector on it. That turned out to be more of a challenge than I was anticipating. You can't get any solder on the outside of the connector as it will interfere with the way it seats in the plastic EC5 housing. Also, the clearance on EC5 bullet connectors to the plastic housings are tight, to the point of which installing them is challenging. I ordered a tool that will be here next week for that, but printed up something similar today and used that to assemble the connector for the ESC. I went through several ideas on how to go about it. Took a long time.
I'm going to connect the basics and do a test to verify the motor/ESC work properly. I still have to figure out how to mount a FPV camera and the lights I'll be using. I'll be the only one around when running this thing so getting video isn't going to be something easily done. I got a camera and a GPS module and the component that adds the speed to the video. I might even run a front/rear camera setup.