• Welcome to Tekno RC Forums! Are you a Tekno RC fan? If so you're in luck as you've have arrived to the biggest and best Tekno RC community.

    Come join our community and ask your questions, show off your Tekno RCs and share your experience!

MT410 Build -- Lots of Upgrades and Stuff

This site may earn a commission from merchant affiliate
links, including eBay, Amazon, and others.

devnull

Well-known member
Lifetime Premium!
Supporting Member
Build Thread Contributor
Messages
158
Reaction score
95
Tekno RC's
  1. MT410
Stuff started being delivered on Friday/Saturday. Then I checked the tracking on my MT410, and found it was going to get here a day early.

I went downstairs and got it along with some more parts. I ordered a lot of extraneous upgrades.

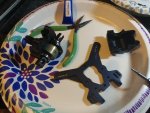
So this is the pile o' parts and the truck so far!

I know it's hard to tell, but I haven't put anything together yet. I opened the box! That should count toward something.

I got the M2C diff cups. I saw yesterday that Fioroni makes a center diff cup for Teknos. I believe it has a brass inner lining that helps extract the heat. Almost pulled the trigger on it but figured since I already have these there's not much I'm going to be doing to warrant another $53 on that.

I did buy a Fioroni center diff for another build I'm working on. I might poke around this build to see how that matches up with the Tekno CD. I bought a Mugen version, as that's what I had put in my G-maxx G2R. Long term, no, that wouldn't be a good choice as it's fairly high maintenance. Won't be driving the G2R that often, so it won't be as much a deal there. But it would be cool to try it out if it were to fit.

I'll sort through some things tonight and look through the instructions.

2511
 
Oh, I'm just joking about that. I'm looking forward to the build.

Got some pics of the Traktion Drive I bought when I assembled it last night, and some shots of the diff assembly. I'm using the M2C diff cups so it's a little different. I'll put together an update sometime today.
 
I've been interested in the Traktion Drive, so I bought one to see what I think of it. I'm not so much concerned about my truck driving in a style of a nitro, but rather I bought it because of a certain measure of protection it could bring to the drivetrain.

2518


There are four sets of springs that come with it. I decided to use the second strongest as that should be more appropriate for the driving I'll be doing, which will mainly be on higher traction surfaces.

2519


2520


Wasn't too difficult to assemble. With the stronger springs it's a little more challenging to get the clutch shoes compressed enough to slide them in the clutch bell.

2521


2522


And then mounted it on the motor.

2523


2524


It will be a while before I can really comment on it from a performance standpoint -- and seeing I don't have much experience with RCs in general that might not be worth much. I suppose I'll swap back and forth between a pinion and this thing.
 
I have been very curious about the Traktion drive. Looking forward to hearing your thoughts.

What motor is that?
 
I did get into assembling the differentials too. Center diff is ready to go, whereas it took so much of the 100K diff fluid that there isn't any left for the front diff. And I don't have any 100K diff fluid here, so I had to order some. It'll be here on Saturday.

The reason the center diff took so much fluid is that I'm using a different diff cup. I ordered the M2C set.

Here's a comparison of the stock diff cup and a M2C aluminum version.

2525


The M2C diff cup is supposed to hold 2X the amount of fluid, and seeing I used all the 100K fluid from my kit it appears that is accurate.

The build is pretty much as diff builds go -- I tried to make a mess. I probably should have cut down the nozzle to get more flow out of the bottle. Blew it out with too much pressure.

2526


Luckily I avoided the mess.

M2C provides shims that isolate the spider gears from the aluminum cup. It prevents wear on the cup so it will last longer. Or that's what I think I read about it.

You can see the shims in this shot. It's kinda tricky getting installing everything with those shims. On the front/rear diffs I dabbed a little grease on the back of the spider gear. The shims would stick to it, which made for a much easier assembly. Otherwise, they constantly fall off.

2527


I was trying to stick to the directions as closely as possible. I noticed the recommendation was to fill the diff cup to within 1mm of full. That's too much. Had to remove some.

I'm not quite done with the front/rear yet, but figure I'll have that done after work. I'll assemble the front diff with no fluid and soldier on.
 
Whoa - is that really a $300 motor? Those are the prices I see online....
 
They are kinda pricey. I have another one that doesn't have the air circulator that routes air through the motor, same model. It's actually 8 years old and has never been used. I just bought it a few months ago with the MGM ESC that it was originally paired with when purchased.

I got a bit more done on the truck. Finished off the diffs. The front one has no diff fluid as mentioned before. Will have to wait a few days.

2532


Looked at the instructions, and figured the front/rear gearboxes wouldn't take too long. Dug into that and got those done too.

2534


Yeah, I do love my paper plates and bowls!

2535


Well, the rear diff feels reasonably good so I didn't shim it. Will wait until tear down the front diff and put some fluid it in to deal with that.

No problems thus far. Haven't really looked further than where I am presently in the assembly manual. It's just a matter of following instructions and taking my time. 'Course, this is early in the game. But I'm confident this will turn out great!
 

Attachments

  • 20190423_215318_HDR.jpg
    20190423_215318_HDR.jpg
    117.4 KB · Views: 415
I was happily putting my MT410 together last night, wondering how I managed to buy what seems to be more SAE hex bits as opposed to metric (for my cordless screwdriver), which is what I need for...well, 90% of what I work on. (ordered metric today) I ran across apparently the one thing that I don't have. Uh, other than 100K diff fluid. So it's two things.

A 4mm reamer.

So that'll be here today. Will be back to assembly once it's here.
 
I agree with @TBuggy. I bought a nice 4mm reamer and was working on one arm for about 5 minutes with it and the pin was still tight and sticking. Then I went and got the 5/32" chainsaw files and had all 4 arms done perfectly in about a minute and a half. I won't use the reamer again.

What all uses SAE hexes? The only thing that I know of is Associated but I am curious if you know of others. I've had Traxxas, HPI, Tekno, Arrma, Redcat, and Axial and all of them use metric.
 
Its too late by the sounds of it but the cheapest/best reamer I have found are chainsaw files.
5/32" is like 3.96mm and works great for reaming arms.

Thanks for the tip! Ends up I had a file the proper size in a file set I'd bought recently that worked perfectly.

I agree with @TBuggy. I bought a nice 4mm reamer and was working on one arm for about 5 minutes with it and the pin was still tight and sticking. Then I went and got the 5/32" chainsaw files and had all 4 arms done perfectly in about a minute and a half. I won't use the reamer again.

What all uses SAE hexes? The only thing that I know of is Associated but I am curious if you know of others. I've had Traxxas, HPI, Tekno, Arrma, Redcat, and Axial and all of them use metric.

Oh, I did the same thing. That reamer wasn't going to get the job done I chucked it up in a Starrett tap holder and went at it. The 4mm reamer was pretty much free spinning, and never removed much material.

Broke out my set of files, found tone hat worked as I mentioned to TBuggy.

As for the SAE hex bits, I was referring to not so much other RCs, as the E-Revo Brushless, Mini E-Revo and Gorillamaxx G2R I have are all metric, I was referring to whatever else I would use them for.

I appreciate the suggestions!

I've got a few pics of the progress so far, need to do another post.
 
I used the #19 drill instead of the reamer. It was a little tricky to find but I did find it locally at a machine shop supplier. Only cost about $6, and worked like a charm. It Took a few seconds to do each arm and was much easier than I thought it would be.
 
I used the #19 drill instead of the reamer. It was a little tricky to find but I did find it locally at a machine shop supplier. Only cost about $6, and worked like a charm. It Took a few seconds to do each arm and was much easier than I thought it would be.

I'd have bought one as well had I not had that file already, although I didn't dig through my cache of drills either. I probably have something on hand that would get me in the ballpark.
 
I received the 100K diff oil I'd ordered and filled up the front diff. Assembled the front gearbox, so that's good now.

I have the rear end assembled now, went together without any problems.

Before the hub/CVA assemblies were added.

2540


2541


2542


Finished it off. I noticed I haven't tightened down the button head screws near the hinge pins on the suspension arms.

2543


2544


2545
2546


2548


I just realized I forgot to add dry lube to the hinge pins. Might remove the C block and add it. Was thinking of using it on the pivot balls too.
 

Attachments

  • 2019-04-27-142155.jpg
    2019-04-27-142155.jpg
    102.7 KB · Views: 366
A little tip for that will help frustration in the future is to add a washer before the nut that holds the camber links on. Since there is no flange on the nut side of the ball stud, with the right impact those camber links can/will pop right off and over the nut.

Just something I learned to solve a frustrating problem I had a few times.
 
@TBuggy Thanks for the suggestion! I found I have some M3 washers in the stylistically correct black for this occasion.

I'll add the washers today. Was just about ready to install them on the front assembly.

I don't know if it's just me where toward the end of my assembly session yesterday I found that attempting to screw into the bearing carriers/steering hubs was difficult, to the point of which I was wondering if the plastic on those pieces is a different, tougher composition. I'd worked on it for a while and might have just been getting tired. I'd line up the two hub pieces together and attempt to thread the M4 screw in through the bushing and just didn't have much luck initially. Perhaps I didn't line them up perfectly. And I should have started the M4 into the hole to get it started, which makes it easier to assemble too.

I also should get out a M3 and M4 tap for this reason, too. Just running the tap into a hole 4mm or so would make it easier to get it started( these are bottom taps). It's not really a problem per se, but pressing on a screw to force it into the hole while turning it sometimes leads to it not going in straight. It's not a big deal, as it will straighten out.
 
Got some more done on the MT410 today. Finished off the front end assembly.

2558


2559


Built the steering assembly.

2560


I put an aluminum steering cover plate on the assembly.

2561


2562


I almost didn't do the steering assembly as I have aluminum components coming. They should have been here Saturday, Now when I check the tracking on the shipment, it just shows it will be late and the last update shows it being in Illinois (the order is from Fierce RC -- although this minor problem is on USPS).

So I decided to go ahead and get started on a chassis protector. Bill DeLong had posted this link in another thread here.

How to Make a Custom Chassis Protector

I'm thinking I might have gone about this so far in a way that will make it more difficult to attach the protector to the truck. I attached the chassis plate to the sheet, ran a sharpie around it to create the outline, then cut the form out. Looking at what Bill DeLong did I think he applied the sheet to the chassis, then cut the edges.

Eh, if it doesn't go on easily or well, I'll just toss it and do it that way.


2563


2564


2565


I also have some clear paint protector that I'll put over this.

Bill used a Xacto knife to cut the holes for screws on his. I ordered a set of hole punches that will be here on Tuesday.

I'm thinking this first attempt will be a botched effort, but I'll give it a shot and see how it turns out. The vinyl sheet itself seems to stretch without too much effort, such as when I was pulling tape of I used to hold it to the chassis when was doing the outline it seemed llke it stretched. Dunno, we'll see. The roll is big enough to do several vehicles.
 

Recent Popular Liked

Back
Top