I love the Sanwa MT-S. I couldn't ask for a better middle class radio in that sub $200 price range. I'll probably never use a lot of the features that are found on the radio. When I was shopping, I was looking for a transmitter comparable to my very faithful Futaba 3PM. Having choices of Sanwa compatible receivers with built-in antenna was the icing on the cake. I ultimately decided to jump on one deal that didn't include any receivers.I just rebuilt a buggy a few days ago and went with Castle and a generic Truggy can I had laying around. If I had to do it again, I would just do the castle combo. You can save a few bucks by getting an ebay non-sensored motor if you wanted to.
Radio wise, I run Sanwa, Futaba and Radiolink. My favorite is the Sanwa with the RX-482 built-in antenna. I’m not a very sophisticated driver and like the simplicity of this Tx and the absence of a tube through the body! I have the MT-S, that is their entry range.
Navigation
Install the app
How to install the app on iOS
Follow along with the video below to see how to install our site as a web app on your home screen.
Note: This feature may not be available in some browsers.
More options
Style variation
-
Welcome to Tekno RC Forums! Are you a Tekno RC fan? If so you're in luck as you've have arrived to the biggest and best Tekno RC community.
Come join our community and ask your questions, show off your Tekno RCs and share your experience!
You are using an out of date browser. It may not display this or other websites correctly.
You should upgrade or use an alternative browser.
You should upgrade or use an alternative browser.
EB48 2.0 Electronics Setup?
- Thread starter Ifti
- Start date
This site may earn a commission from merchant affiliate
links, including eBay, Amazon, and others.
links, including eBay, Amazon, and others.
- Thread starter
- #22
I love the Sanwa MT-S. I couldn't ask for a better middle class radio in that sub $200 price range. I'll probably never use a lot of the features that are found on the radio. When I was shopping, I was looking for a transmitter comparable to my very faithful Futaba 3PM. Having choices of Sanwa compatible receivers with built-in antenna was the icing on the cake. I ultimately decided to jump on one deal that didn't include any receivers.
Yup thats what Ive ordered - the Sanwa MT-S. It should do me perfectly fine!! lol
Let the wait begin..!!!?
When did Matt ship it..?? Mine arrived next day..???
- Thread starter
- #25
Let the wait begin..!!!?
When did Matt ship it..?? Mine arrived next day..???
yesterday ?
- Thread starter
- #26
FHE_nld
Well-known member
Sweet, have fun building
")
- Thread starter
- #29
- Thread starter
- #30
Just interested to see in which order do you generally install electronics.....
Do you start with getting the motor and ESC into place, then the receiver and then the servo last (since it needs to be powered and centred etc)?
Or do you get the motor and ESC connected to the receiver, then power and set up, before anything else?
Do you start with getting the motor and ESC into place, then the receiver and then the servo last (since it needs to be powered and centred etc)?
Or do you get the motor and ESC connected to the receiver, then power and set up, before anything else?
- Messages
- 302
- Reaction score
- 394
Servo installed on the mount, then servo assembly put on the chassis. Then I like to install the motor loosely on the mount so I can see how I want the esc to be oriented. Next I place the esc (just resting it, no tape yet) in the orientation I like, if I can solder the motor/esc in the car I will tape the esc now, if not I will put leads on the esc outside the car and then tape it to the tray. I then install the rx box bottom and tape the rx in. Install the mudguard and route the servo and esc wires through the guides and into the rx box. Solder up the motor and you're basically done.Just interested to see in which order do you generally install electronics.....
Do you start with getting the motor and ESC into place, then the receiver and then the servo last (since it needs to be powered and centred etc)?
Or do you get the motor and ESC connected to the receiver, then power and set up, before anything else?
- Thread starter
- #32
Servo installed on the mount, then servo assembly put on the chassis. Then I like to install the motor loosely on the mount so I can see how I want the esc to be oriented. Next I place the esc (just resting it, no tape yet) in the orientation I like, if I can solder the motor/esc in the car I will tape the esc now, if not I will put leads on the esc outside the car and then tape it to the tray. I then install the rx box bottom and tape the rx in. Install the mudguard and route the servo and esc wires through the guides and into the rx box. Solder up the motor and you're basically done.
Perfect - haven't had time to get all my electronics in just yet but your method seems like a solid route to take.
@Ifti how have you got on with the electronics. Was looking at the SCT version as it's a bit smaller, but I can get a combo kit of the plus with the HW motor. https://www.modelsport.co.uk/hobbywing-xerun-combo-xr8-plus-4268-b-1900kv/rc-car-products/420928
Stock shortage everywhere!
Does the plus version fit well?
Stock shortage everywhere!
Does the plus version fit well?
Nahteno
Active member
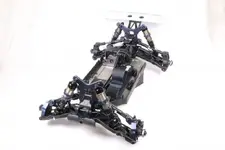
i have some pics of me working out how i will mount mine.@Ifti how have you got on with the electronics. Was looking at the SCT version as it's a bit smaller, but I can get a combo kit of the plus with the HW motor. https://www.modelsport.co.uk/hobbywing-xerun-combo-xr8-plus-4268-b-1900kv/rc-car-products/420928
Stock shortage everywhere!
Does the plus version fit well?
https://www.teknoforums.com/threads/first-build-eb48-2-0.1643/
- Thread starter
- #35
@Ifti how have you got on with the electronics. Was looking at the SCT version as it's a bit smaller, but I can get a combo kit of the plus with the HW motor. https://www.modelsport.co.uk/hobbywing-xerun-combo-xr8-plus-4268-b-1900kv/rc-car-products/420928
Stock shortage everywhere!
Does the plus version fit well?
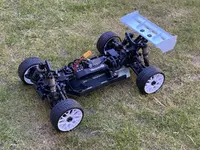
Yes, all fits perfectly - like it was made to measure!
Even managed to get the power switch to the other side, just behind the battery tray.
My soldering isn't great, but its attached and all works! lol
got mine from RPRCDistribution and came for £249 - so a bit cheaper. Not sure if they have stock at the moment or not though.....
I also picked up the WiFi Express module (had some Amazon.com vouchers) which makes the setup and changing settings nice and easy - highly recommend it!
I have a video showing the electronics setup up close - keep an eye on my build thread for it!
https://www.teknoforums.com/threads/tekno-eb48-2-0-complete-video-build-guide.1658/
Attachments
- Thread starter
- #37
I love the Sanwa MT-S. I couldn't ask for a better middle class radio in that sub $200 price range. I'll probably never use a lot of the features that are found on the radio. When I was shopping, I was looking for a transmitter comparable to my very faithful Futaba 3PM. Having choices of Sanwa compatible receivers with built-in antenna was the icing on the cake. I ultimately decided to jump on one deal that didn't include any receivers.
How do I set the steering endpoints on the MT-S?
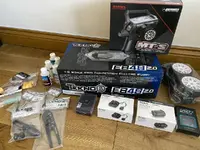
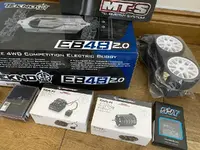
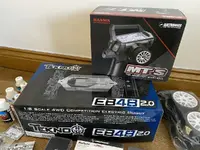
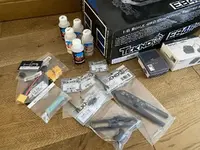
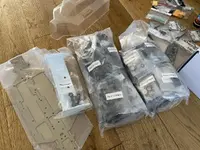
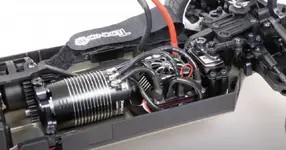
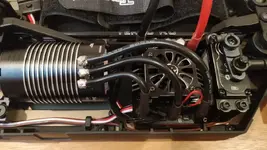
So this is my electronics set up.
Soldering is not my strong point. But they all seem attached!
Guess I wait to see if any break...
Servo is getting scratched by the horn. And also I'm not convinced turns left as much as right. My EPA are reduced to 75% on the left on the transmitter to stop it hitting the stop screw. Not an issue with the right side.
Attachments
- Messages
- 302
- Reaction score
- 394
Servo is getting scratched by the horn. And also I'm not convinced turns left as much as right. My EPA are reduced to 75% on the left on the transmitter to stop it hitting the stop screw. Not an issue with the right side.
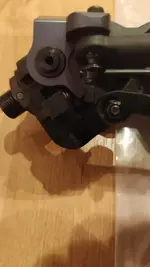
What do you mean when you say "...to stop it hitting the stop screw." ? Where exactly is it hitting? You should be able to achieve max throw in both directions. 75% EPA sounds too low for any transmitter, especially when using the inside hole on our servo horn.
If for some reason the servo horn is too low for your servo, you can space the horn up with a washer/shim/spacer so that it no longer hits the servo body.
@Matthew_Armeni
Will get a washer.
As for hitting..... Its here....
I've no clue, I've moved the servo arm to the inside hole and that improved stuff, but I've got an EPA 100% for the other side and EPA 75% for this side to stop the hitting.
Will get a washer.
As for hitting..... Its here....
I've no clue, I've moved the servo arm to the inside hole and that improved stuff, but I've got an EPA 100% for the other side and EPA 75% for this side to stop the hitting.
Attachments
Similar threads
- Replies
- 7
- Views
- 955