Loyd
Member
Hello Tekno,
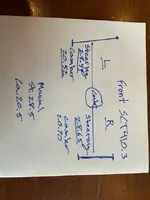
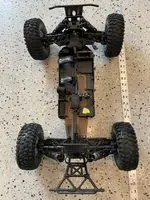
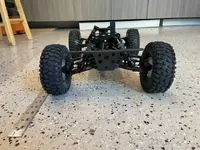
Recently completed 410.3 build and need some help with tuning the front end. With the right side of car laying flat on the outside of tires the left side is clearly toed out and there is positive camber. Or laying on left side right side is toed out. Attached are pictures illustrating my situation and my measurements of the camber (both sides mounted stock) and steering links. I have read on this forum that it is ideal for both steering links to be near identical in length as possible.
My plan is to shorten the right steering link to correct the toe out and make both links more similar in length. Then adjust camber of left wheel by shortening this link. This makes sense in my head but by shortening left camber link I will be making the difference between both camber links greater which is why I thought to check on the forum. Any thoughts/suggestions and tips on how to perform/measure this tune would be awesome. Thank You!