• Welcome to Tekno RC Forums! Are you a Tekno RC fan? If so you're in luck as you've have arrived to the biggest and best Tekno RC community.

    Come join our community and ask your questions, show off your Tekno RCs and share your experience!

The Phoenix Project: Rebuilding a thrashed EB410, to use to try racing!

This site may earn a commission from merchant affiliate
links, including eBay, Amazon, and others.

JasonRP

Member
Messages
5
Reaction score
0
Hi folks!
I'm new to Tekno, new to racing, have dabbled in RC stuff for a little more than 20 years or so.. I've been out of the game for perhaps 10 years. A *lot* has changed!!! Back then, I had an HPI Nitro RS4-2, and an HPI Nitro MT. Also a few Tamiya electric cars: TL-01, TB-02, TT-01, and M-03s.. Finally, I had a brushed motor Traxxas Slash. All this stuff 1/10-- and for the electric cars- literally ALL were bought with the idea of racing, which then never materialized. These cars were all sold or given away (including the crappy AM radios!) Now I have the bug again, and want to start racing.

After looking at Associated, and TLR, I found the Tekno stuff- and scored a used EB410. I love to fix things up, and this needs a LOT of fixing. While it was in a LOT worse shape than I'd originally thought (I've paid more in parts than a new EB410.2 kit would cost- DANGIT!) I still think I got a pretty good deal- it has some upgrades (carbon fiber rear shock tower/motor support/fan mount/front body mount; rear outside captured hinge pins, exotek front bulkhead/camber saver) and new tires, plus a Savox 1268 servo. So, I'm still really glad I got the one I got- I'm not sure I'd have splurged for a new kit had I not thought I was getting a "deal" on a used one, and I'll have plenty of spares this way too.

In case anyone else likes this kind of post, I figured I'd document the process of rebuilding the buggy- and using it to try my hand at racing- local track guys race 2wd and 4wd stock and mod 1/10 buggy and Short Course, 2wd stock and mod ST. I'm picking 4wd stock 13.5 (I know this car is technically a bit heavy for stock 13.5, but I figure- it ain't gonna be it's weight holding me back!) lol. Any tips would be much appreciated- I've read the manual a bit, and some 410 posts on forums here and RCTech.net.. I do have a question: People mention the 410.1 a bit- are they referring to some in-between version of the 410? Or is this a way to refer to the first one- the 410?

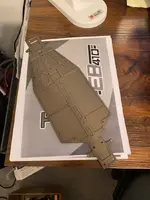
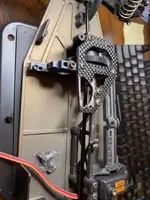
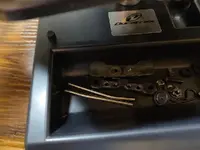
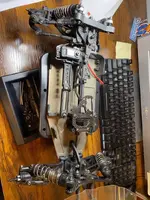
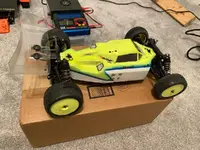
Here's some pics of what I started with- and where I am now (taken mostly apart- cleaned the frame). I plan to use ultrasonic to clean the bearings. Any suggestions on cleaning the Carbon-reinforced plastic parts I plan on re-using? I will be starting it out racing mostly stock configuration (except for the spacers between the x-rings in the shocks)- and will mod only if entirely necessary (focusing instead on setup and learning to drive)..

What I've found so far needing rebuilt:
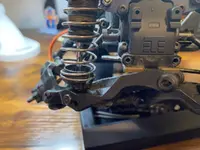
  • bent inner hinge pins- all 4, but the front two so bad that the lower control arm pivot holes were ovaled out, and the A and B blocks were bent)
  • Front bumper almost worn completely away, missing 1 of the rear braces, missing one of the battery plastic guides, missing the servo horn, missing the fan support.
  • all 4 shocks badly leaking, two shock caps are aluminum, two are original plastic. 2 of the 3 diffs are leaking. Unknown springs and fluids throughout.
  • Though the tires have never been used, the front wheel rims seem to rub the spindle carriers.. I don't think they're the 22-4 TLR style rims.
  • Body has small cracks in 4 places, and a tiny bit dented in on the top. Part of the front windshield is cut out, and some of the paint is worn off. (that being said- it looks super scrappy this way- I think I will fiberglass the cracks- and use this body for the initial races!)
  • Frame has some scratches on the bottom, but not too bad- is not bent, and is not cracked. It will get me through at least the initial races.
  • Car is very dirty.
 

Attachments

  • IMG_4133.jpg
    IMG_4133.jpg
    110.7 KB · Views: 91
  • IMG_4131.jpg
    IMG_4131.jpg
    121 KB · Views: 85
  • IMG_4130.jpg
    IMG_4130.jpg
    120 KB · Views: 95
  • IMG_4129.jpg
    IMG_4129.jpg
    120.9 KB · Views: 89
  • IMG_4126.jpg
    IMG_4126.jpg
    154.1 KB · Views: 92
  • IMG_4123.jpg
    IMG_4123.jpg
    193.1 KB · Views: 85
So- about some replacement parts.. Here's some of what's been rounded up so far:
(Still waiting on some other items in the mail, but this is most of it... I genuinely tried to support the LHS too for the motor, transponder, fan, tires/wheels, lipo, one body, and paint..)
I'll be rebuilding the shocks, all diffs, and using all factory/original fluides. I'll be rebuilding the buggy to stock configuration- including putting back the stock rear shock tower, and rear-mounting the shocks in the original position (but will use the two carbon upper braces...)
I was not happy to see that the lipo I bought for this car did not include the freakin wires/balancer plug. Really? I think I have the right wire from other projects, but not the balencer plug. Kinda feel like Protek coulda done better by including this. Oh well...

IMG_4134.jpg
 
If it's the more pricey way to get there it only matters if it matters to you. As long as you're having fun with it and didn't skip any meals to get here it's all good.

There was the 410 that you have and the current 410.2. I can only guess .1 was someones way of designating the original for some reason. Don't forget a servo horn if you don't have one already. TKR6563A

On your carbon parts a common tip is to CA glue the edges to keep them from delaminating. Simple Green is a common cleaner used. Works good for cleaning the release agent off the tires before gluing also. Did you get tire glue?

No wires on the 2S shorty is normal. It should have come with bullet connectors for the main power and balance wire for you to solder up. Most will go direct to the battery from the esc. I ended up making a short lead with a XT60 because I got tired of messing with the bullets. I don't compete so I don't care about the additional resistance that's likely negligible if measured.
 
If it's the more pricey way to get there it only matters if it matters to you. As long as you're having fun with it and didn't skip any meals to get here it's all good.
Yes- most definately.. Absolutely having fun, not skipping any meals, and think I'm learning real-world post-racing repairs, so it's all good.

There was the 410 that you have and the current 410.2. I can only guess .1 was someones way of designating the original for some reason. Don't forget a servo horn if you don't have one already. TKR6563A
Ok- that explains it. And, yup- I ordered the TKR6563A.

On your carbon parts a common tip is to CA glue the edges to keep them from delaminating. Simple Green is a common cleaner used. Works good for cleaning the release agent off the tires before gluing also. Did you get tire glue?
Roger- will look to prep the edges with CA. Have lots of Simple Green- so I'll use that on the plastics. And yup- have the special tire glue, just glued up some tires- and used Simple Green to remove the release agent- this process was not as bad as I had remembered it from many years ago when I'd done this last.

No wires on the 2S shorty is normal. It should have come with bullet connectors for the main power and balance wire for you to solder up. Most will go direct to the battery from the esc. I ended up making a short lead with a XT60 because I got tired of messing with the bullets. I don't compete so I don't care about the additional resistance that's likely negligible if measured.
Ah- ok. Now that you mention it- I think it makes sense- if getting super efficient/racing mode, people probably want the minimum wires and connectors possible. Do racers going direct to esc just plug in/unplug the bullet connectors on the lipo? Maybe just have one harness on the side, for charging duties?

Jason
 
Welp, two steps forward, and one step back....

I got to rebuilding the diffs- which went well. I tore them apart because they were leaky, had unknown fluids, and were in unknown condition. Fortunately, the gears were all ok, a couple of worn-out out-drives were replaced, everything cleaned, and re-assembled with new o-rings, green grease, the stock new fluids, and new gaskets..

IMG_4136.jpg
IMG_4138.jpg


...On to bearing disassembly, and cleaning. See- when you're foolish like me, and you start out with a car that is completely blown out, you have to try to re-use what you can if you're going to have any possibly sort of economy with this.. (bwahahahahaha there is no economy in RC!)

I really did want to see how hard it was to clean and lube bearings, and already had a harbor freight ultrasonic cleaner in stock! So, I removed the seals (careful prying with xacto gets them out undamaged), and ran the bearings through three steps of ultrasonic cleaning: Naptha, then hot soapy water, then rubbing alcohol. (The seals just got hot soapy water and then hot clean water rinse..) Filling the ultrasonic cleaner up with just hot tap water, you can use cut down solo cups, to hold your parts in whatever cleaning fluid you want- without contaminating the whole ultrasonic cleaner (also lets you do multiple types of cleaning fluids/parts at once)..

I then blotted the bearings with paper towel, stuck on top of aluminum foil on top of the headed bed of a 3d printer to dry for 10 minutes. Then 3:1 oil, then seals re-installed. They spin GREAT! I will do this even with new bearings for race applications now- as the oil is faster than stock grease...

IMG_4137.jpg


Ok, now, was looking my clean parts over- thinking about what to start on next with the project- when I realized, my frame is cracked.. DANGIT! (How did I miss seeing this before?!) Ok, so, remember that economy thing I mentioned above? Yeah, well... (I shoulda bought a new kit for sure!) Oh well, too far into it now, gonna just continue rebuilding this one. I ordered a new frame. Once the buggy is rebuilt- I will round up all blown out parts, and send them to Tekno- who I think will take any bad parts, and sell you new ones at 50% discount. If they still do this- I'll receive spare parts at a decent price- which I will probably need if I'm gonna race this thing anyways- so, maybe this hasn't been entirely like lighting money on fire? :)

IMG_4139.jpg
IMG_4140.jpg


Ultimately- I am still enjoying the build/restoration, and will enjoy learning to race, so I'm still excited about this buggy/not too bummed with the deal. I maintain- starting with a screwed up RC and fixing it- perhaps will be a little easier to get on the track than starting with a new and perfect buggy- then cringing when there's inevitable crashing on the track!
 
Save all of your bad parts and send them all in together for the 50% replacement warranty. This will save on shipping costs and ultimately yield a better deal for you.
 
You sure do have your work cut out for ya.
...Do racers going direct to esc just plug in/unplug the bullet connectors on the lipo? Maybe just have one harness on the side, for charging duties?

Jason
Yes, and yes. You'll probably want some low profile bullets to solder on your ESC. Or, you could reuse some old bullets, and Dremel a groove on the side. I used some old EC5 connector male pieces that I had saved for some reason...
1679963405969.png

Didn't the Protek pack come with any connectors?
Welp, two steps forward, and one step back....


1679968262287.png

Ultimately- I am still enjoying the build/restoration, and will enjoy learning to race, so I'm still excited about this buggy/not too bummed with the deal. I maintain- starting with a screwed up RC and fixing it- perhaps will be a little easier to get on the track than starting with a new and perfect buggy- then cringing when there's inevitable crashing on the track!
Ah man, that sucks... it would have to be the most expensive part.
 
Last edited:
Ok, here we are:
New Parts:
I got a new frame, needed three of the four aluminum blocks for the control arm hinge pins, all new hinge pins, all four control arms, all but one driveshafts replaces, 3 of the 6 out drives replaced, a few new bearings, u-joint rebuild kits, about half of the ball sockets replaced, hinge pin inserts, a bunch of new screws, new wheels/tires. Some plastics replaced only if it netted me other parts I needed that were missing or broken (like new front bumper, new chassis brace/body mount set)..

Re-used Parts:
I was able to reuse all diff parts (except for the seals, which I elected to replace- but maybe could have reused), most of the bearings, the spindles and knuckles, all 4 axles, and both the motor upper deck and the front upper deck (already upgraded to carbon fiber pieces by previous owner. There was also an exotec front camber brace that I re-used too. Most screws/nuts/bolts, etc. Wheel hexes, grub screws, etc.

This is where it sits now.
IMG_4161.jpg


Still needed to do:
Rebuild the shocks (I did clean then with ultrasonic- but need to drain the fluid, put in the 410.2 spacer between the emulsion rings, replace emulsion rings, re-fill. It already came with the front aluminum shock caps, so I pony'd up and got the rear ones.

Then I need to install the electronics, final tune the toe/camber, glue the tires, paint the body, and apply stickers, etc.. I am going to start out with 100% stock tune- will run on a clay track (can't remember if I mentioned this before)

Note to anyone reading/considering doing this: There is ZERO economy in this plan.. I've probably spent enough to buy two NIB EB410.2 kits (or close to it).. When I'm done, I'll have a like-new EB410 (not the EB410.2), but will have a LOT of spares. If you're considering buying a slider/roller- know who you're buying from, or at the very least, know what you're buying 100%.

I'm still happy with my deal- because I've kinda enjoyed hunting all the parts, diagnosing what is needed, etc. I bought parts over the course of a few weeks- so it wasn't all one huge $$$ hit either. BUT: The seller's idea of "it is pretty much ready to race once you install electronics" MAY have been true to him, but, it would have been racing a pretty much worn out and bent up car...
:)
 

Recent Popular Liked

Back
Top