• Welcome to Tekno RC Forums! Are you a Tekno RC fan? If so you're in luck as you've have arrived to the biggest and best Tekno RC community.

    Come join our community and ask your questions, show off your Tekno RCs and share your experience!

DB48 DB48 It has begun!

This site may earn a commission from merchant affiliate
links, including eBay, Amazon, and others.

Hye

Well-known member
Messages
139
Reaction score
72
Location
The weather is always good here.
Tekno RC's
  1. MT410
Driving Style
Basher
So excited about this build. I would like to race it but it wouldn’t be to often because the tracks are so far away. Parts are trickling in and I have some progress into it. A lot of this build is first time stuff. Like making the cage mount properly, cutting out the body panels, and the wheels with hubs. There is some information on the build I have found online, but they are kind of vague. For example, the body panels. I accepted the challenge and dove in.

I’ll post details along the way. I’m open to any suggestions, so please feel free to chime in. I’m aware of the incredible craftsmanship of members in this forum. I have become a fan of a few of them myself. I’m prone to making mistakes and am open to constructive criticism. Thanks.


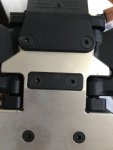
Here I added the M2C ET chassis and braces.
023DEFA1-CCD3-421C-8D5D-E7FC32E6C5BE.jpeg


Just laid the Nomad cage on top to see what it’s going to look like.
87287533-85A7-43C5-A358-0F14FAE192DC.jpeg


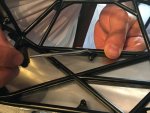
This is when things started to get complicated. Took me some time(way to much time), but I finally came up with an idea for the body posts. I’m still waiting on parts to arrive. For the body panels I used a piece of cardboard and cut out the right shape and size. Traced it on a .25 sheet and started to cut using sheers. I still need to file the edges. The wheels became an issue when I discovered that the wheel nut that holds it in place barely fit. Then the nut driver is to thick to even reach the nut. Any help here would be greatly appreciated.
918E1F04-39AB-4F53-8D68-999480D65FFE.jpeg
 
I'm sure being in this hobby you must have a few of the 4 way freebie wrenches that they usually give you with ready to run kits. Take one of those and Dremel down the outside till it fits in the wheels.

Looks like you're off to a great start! Nice touch going straight for the M2C chassis. If I was gonna do it that would be my choice as well.
 
Looking great so far! Here’s what I did for a nut driver in a tight spot. I just turned it on this bench sander til it was narrow enough to fit.
5506CC78-75FE-421E-BD71-EBA9EF08206E.jpeg
CB6AFD05-0F17-4A35-8114-1A012A08958B.jpeg
 
Last edited:
nice "fix", I love modifying tools for free!

some nut drivers have thin walls, some don't, i have a dynamite that is thick wall and some cheap turnigy that has thin walls that can fit in tighter spaces, one of those things that we don't think about until we face that issue. in the future i'll only buy the thin walled ones.

highly recommend getting the alum center diff mount on the other side, and the alum center diff top plate - that will make that center diff area rock solid.
 
I'm sure being in this hobby you must have a few of the 4 way freebie wrenches that they usually give you with ready to run kits. Take one of those and Dremel down the outside till it fits in the wheels.

Looks like you're off to a great start! Nice touch going straight for the M2C chassis. If I was gonna do it that would be my choice as well.
I do have those wrenches. I have a few lol. Good idea.

The M2C chassis appears to be an upgrade. Dollarhobby had the stock for $78 and I found the M2C one for $90. The M2C one has replaceable skid plates front and back. There are a few other things as well.
4968F119-697D-46D6-869C-D10A2ECFADA2.jpeg
 

Attachments

  • D662A030-240A-42C3-9FBD-70F34CFC4E8D.jpeg
    D662A030-240A-42C3-9FBD-70F34CFC4E8D.jpeg
    74.5 KB · Views: 364
Last edited:
Or... I believe Vanquish makes a narrow nut driver just for this purpose. I remember reading on it FB not too long ago. If I recall correctly you can’t buy it individually....you have to buy it as part of a set. What size are the wheel nuts?
I’m thinking it’s in this set
http://www.vanquishproducts.com/metric-nut-driver-tool-set/

I think it’s 8mm you need? If so they have the bit individually...just need handle
http://www.vanquishproducts.com/8mm-nut-driver-replacement-tool-tip/
I’m definitely ordering these. I’ll start by shaving one I have for now and use it until I receive the vanquish set. Thank you so much for posting this information with links included!
 
nice "fix", I love modifying tools for free!

some nut drivers have thin walls, some don't, i have a dynamite that is thick wall and some cheap turnigy that has thin walls that can fit in tighter spaces, one of those things that we don't think about until we face that issue. in the future i'll only buy the thin walled ones.

highly recommend getting the alum center diff mount on the other side, and the alum center diff top plate - that will make that center diff area rock solid.
I agree. I was so excited when the wheels and tires came in. Then I got so sad when my driver didn’t fit.

Since I’m so heavily invested in this build already. I don’t see why I wouldn’t get the top plate and center mount too. Thanks for that advice. The best part about tekno is that most parts are interchangeable.
 
Back to panels...

First I cut an approximate size of cardboard. Thin cardboard works better for me. It’s much easier to cut. With these little clips, I held cardboard in place and traced the areas I needed to cut.
E813473D-3A75-4B2C-96B7-2B875DD60492.jpeg


This gave me an approximate size, but will still needed some trimming.
5C09A004-2CBB-4FD8-8B70-A9226FBFE1A0.jpeg


After I held the cardboard in place. I used a pick to mark where the holes for the screws will go.
4197591A-7F79-4640-973D-5EA2FFCDF87E.jpeg
6CA70F9D-1777-402F-ACAC-4F53DD8ACA21.jpeg


I circled the holes here to show marks I made with pick.
5ACF8659-5475-4A06-8FE2-FDCCD686A307.jpeg
C878D65E-7F0A-4CDB-A805-361634122F64.jpeg
213D3BA2-5BE3-4A67-9279-FFAB8D46299A.jpeg


Screwed on the cardboard panel to get a better idea of where I’m at.
B084C11A-F41F-4D8D-8F03-8014818BDC19.jpeg


Trimmed some edges to my desired look.
DC21ADEB-B780-42A4-9A90-C646ED55B6B6.jpeg


Starting to look good.
631EDFC3-32A7-4E97-8BF9-01141CB193D5.jpeg


When I was satisfied with my trimming. I laid it on my .25 sheet and traced.
367E3C4F-ECEB-4391-9A2A-9A2BC31EB7B1.jpeg


FCCEC115-F030-43FF-A909-43DEB58CCB9A.jpeg


Cut it out with tin snips. This part sucks because of how big and bulky the tin snips are.
5224FE43-BF23-4800-8ECA-7A8CB48520F0.jpeg


I left the bent edges for later. I still had to trim for a more precise finish.
97F58B39-369D-43CA-B58F-0B6E79422CC1.jpeg


Used the pick to mark screw holes. After marking I used increased pressure to make a depressed area to help keep the drill bit from wondering.
09D1B825-247D-446A-B73A-134FB078400D.jpeg


While the panel was screwed on. I took note of where I needed to make my lines straighter. Used a straight edge and marker then trimmed. Surprisingly the tin snips did well during this task. After I had reached my desired look. I removed the panel and laid it flat on my work bench and lightly tapped the edges of the panel with a hammer. This worked out all the kinks. This is my second panel I have ever cut. The hood piece being my first. It does seem to get easier. I decided to do the hardest panel first and work my way down to easiest. I still need to take a file to the edges. Then I can use this finished side panel for the other side. It’s the same size just flipped.
4FA31CD5-204E-4EA1-8DD3-D98F4F38ABB6.jpeg
 

Attachments

  • D5D1B5E8-FA67-487D-97AF-0C2864F4F02B.jpeg
    D5D1B5E8-FA67-487D-97AF-0C2864F4F02B.jpeg
    117.5 KB · Views: 360
  • 44248E2A-D0E5-4531-94D2-83A0818FF8E7.jpeg
    44248E2A-D0E5-4531-94D2-83A0818FF8E7.jpeg
    114.7 KB · Views: 358
Last edited:
Thanks going to be epic when done!
It’s turning out real nice. With the longer chassis I’m looking forward to seeing what it will do with paddle tires in the sand. My mt410 was difficult to pick up speed because it’s a wheelie machine.
 
wow! this is amazing! thank you for taking the time to share and document your build. I wish I had the patience to do something like this. Are you also the guy over at the Arrma forum who did one of these body's for the Arrma Kraton?
 
wow! this is amazing! thank you for taking the time to share and document your build. I wish I had the patience to do something like this. Are you also the guy over at the Arrma forum who did one of these body's for the Arrma Kraton?
Thanks! I did post a couple of pictures at the arrma forum a few hours ago, but I stated it was for a tekno.
 
Coming along nicely. Great work:)
 
Loving it... i too have been eyeballing the m2c et chassis at amain. using the coupon its $85.49 shipped with the $7.50 off coupon, not bad at all since you're lucky to get the stocker shipped for that much. not sure if i'll get around to it this year though.
definitely interested in how you mount up the body. i used to own a wraith and love the caged body. no more wimpy lexan bodies to replace every few months, i would love to do this conversion just for the bash factor. definitely interested in seeing how you mount up the body.
 
Coming along nicely. Great work:)
Thanks buddy! I really enjoy the desserts buggy look. We off-road quite often and see sand rails and dessert buggy’s all the time. One day in the near future we will have the real thing. For now the tekno version will do just fine lol.
 

Recent Popular Liked

Back
Top